
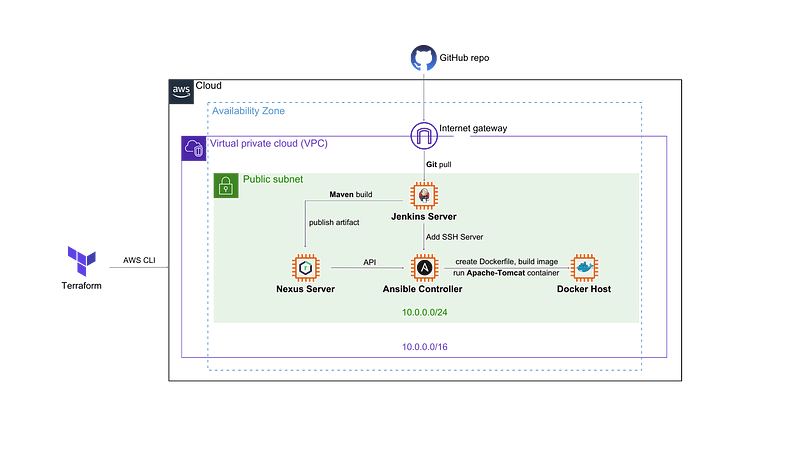
Xây dựng CI/CD Pipeline cho ứng dụng Java web
Tạo một Continuous Integration/Continuous Deployment pipeline để triển khai một ứng dụng Java web đơn giản mỗi khi có cập nhật về source code. Tập trung vào việc ứng dụng tool DevOps.
GitHub repo: https://github.com/holdennguyen/cicd-pipeline-java-webapp
💝 Nguồn tham khảo
Udemy Course: https://www.udemy.com/course/devops-iac-cicd/
⚡️ Tổng quan dự án
CI/CD pipeline trên Jenkins sẽ thực hiện các công việc:
Pull source code của ứng dụng Jave web và các config files (Jenkinsfile, Ansible playbook, Ansible Inventory) từ GitHub repository về Jenkins Server.
Cài đặt và build artifacts từ source code bằng Maven trên Jenkins Server.
Tải artifacts lên Nexus repository trên Nexus Server.
Dùng Ansible tải phiên bản artifacts mới nhất từ Nexus repository xuống Docker host, build Dockerfile và triển khai Java web trên Docker container.
📖 Cấu trúc các file dự án
cicd-pipeline-java-webapp/
├── src/main/webapp
├── userdata/
├── .gitignore
├── Jenkinsfile
├── README.md
├── download-deploy.yaml
├── hosts
├── main.tf
├── variables.tf
└── pom.xml
⚙️ Tạo cơ sở hạ tầng trên AWS với Terraform
Bạn sẽ cần cài đặt:
Terraform CLI (1.2.0+)
AWS account và associated credentials để cho phép tạo resource trên tài khoản AWS.
Mở terminal và chạy lệnh
aws configureNhập thông tin của bạn:
AWS Access Key ID
AWS Secret Access Key
Default region name
Default output format
Copy 2 files main.tf, variables.tf, và thư mục userdata/ trong Github repo này vào working directory của bạn. Chạy các lệnh sau để tạo AWS resource:
File terraform trong repo này sử dụng keypair có tên
ec2đã được tạo sẵn trên AWS. Nếu bạn muốn sử dụng keypairs khác, nhớ cập nhật tên của keypairs trong phầnresource "aws_instance" {key_name}của filemain.tf
terraform init
terraform apply --auto-approve
Chú ý rằng Nexus server sẽ sử dụng
instance type: t2.medium- resource tính phí không hỗ trợ trong AWS free tierĐể tránh tốn thêm phí, chúng ta sẽ không gán IP tĩnh (AWS EIP) cho các servers trong bài hướng dẫn này. Vì vậy các địa chỉ IP public sẽ bị thay đổi và cần cập nhật lại mỗi khi thực hiện lại dự án.
Bạn có thể thay đổi CIDRs, instance type, AMI, và Security Group ports trong file variables.tf. Các scripts trong thư mục userdata/ sẽ được sử dụng để cài đặt Jenkins, Nexus, Ansible, Docker khi tạo EC instances trên AWS.
Những userdata script này viết cho loại AMI:
Amazon Linux 2 AMI (HVM) - Kernel 5.10, SSD Volume Type.
Kiểm tra các AWS resource vừa tạo
4 EC2 instances có địa chỉ IP public và kết nối được mạng.

SG cho phép các inbound ports: 22, 443, 80, 8081, 8080
Bạn cũng có thể tạo các SG giới hạn các port cần thiết tương ứng cho mỗi EC2 instance thay vì sử dụng chung một SG trong hướng dẫn.
Cấu hình cho SSH
Tất cả các EC2 instances đã tạo đều sử dụng cùng keypair ec2, bạn có thể sử dụng nó để SSH vào các EC2.
Jenkins Server và Nexus Server sử dụng default user của AWS EC2 là: ec2-user. Đối với Ansible Controller và Dockerhost, trong userdata script khi tạo EC2 instance Ansible và Docker có các lệnh sau:
# Add user ansible admin
useradd ansibleadmin

# Set password: the below command will avoid re-entering the password
echo "ansibleadmin" | passwd --stdin ansibleadmin

# Modify the sudoers file at /etc/sudoers and add entry
echo 'ansibleadmin  ALL=(ALL)   NOPASSWD: ALL' | tee -a /etc/sudoers
echo 'ec2-user ALL=(ALL) NOPASSWD: ALL' | tee -a /etc/sudoers

# Enable Password Authentication
sed -i 's/PasswordAuthentication no/PasswordAuthentication yes/g' /etc/ssh/sshd_config
systemctl restart sshd
Dùng các câu lệnh trên để tạo user cho Ansible (ansibleadmin) trên Ansible Controller và các Managed Node. Thực hiện việc này sẽ giúp chúng ta dễ dàng giới hạn các quyền cần thiết cho Ansible cũng như theo dõi các hoạt động thực hiện bởi Ansible.
Enable PasswordAuthentication cho SSH configure sẽ giúp chúng ta kết nối dễ dàng hơn giữa Jenkins Server, Ansible Controller, và Docker host (Ansible managed node).
Đó là những gì cần biết trước khi bắt đầu tạo pipeline! 🎉
📝 Tạo Jenkins pipeline
Thiết lập cho lần đầu đăng nhập Jenkins
Truy cập địa chỉ http://[Địa chỉ IPv4 public của Jenkins-Server]:8080 bằng trình duyệt web
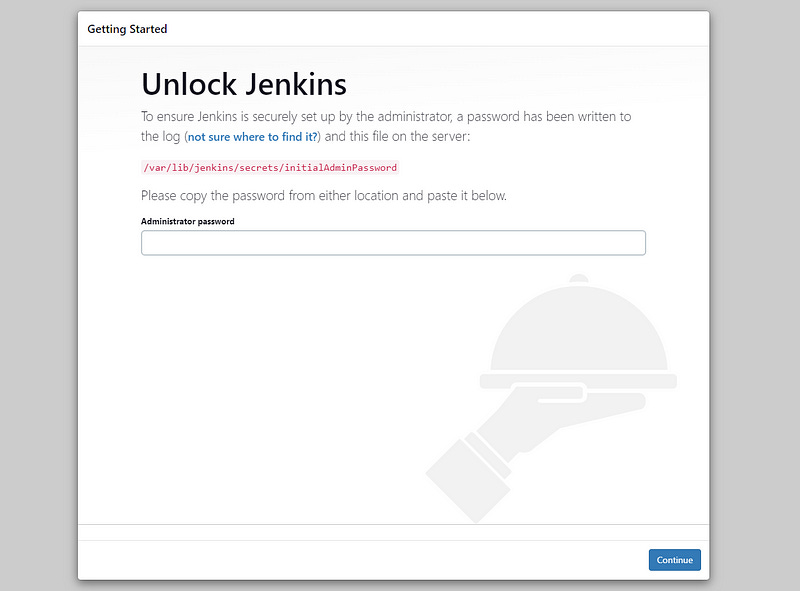
Làm theo hướng dẫn để lấy Administrator password: chạy lệnh sudo cat /var/lib/jenkins/secrets/initialAdminPassword trên Jenkins-server CLI (dùng SSH remote hoặc connect thông qua AWS console).
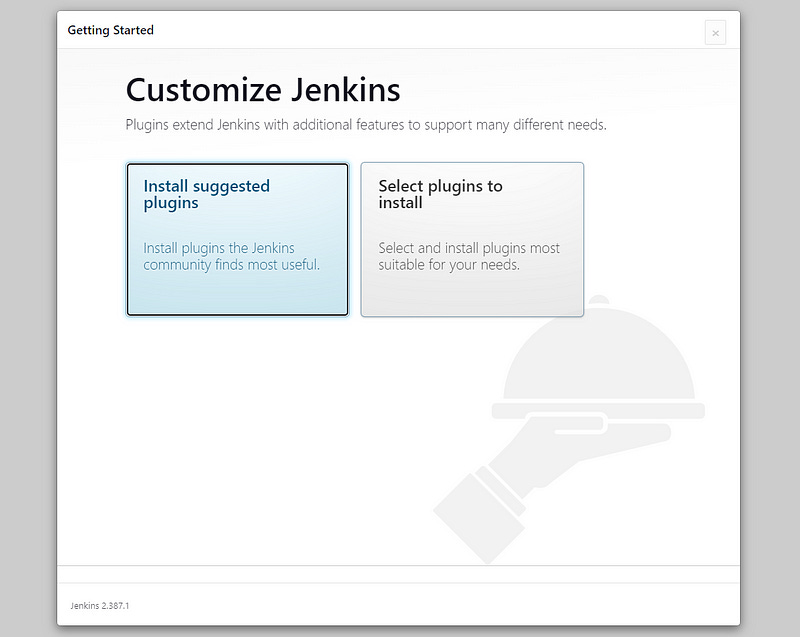
Cài đặt các plugins gợi ý cho Jenkins
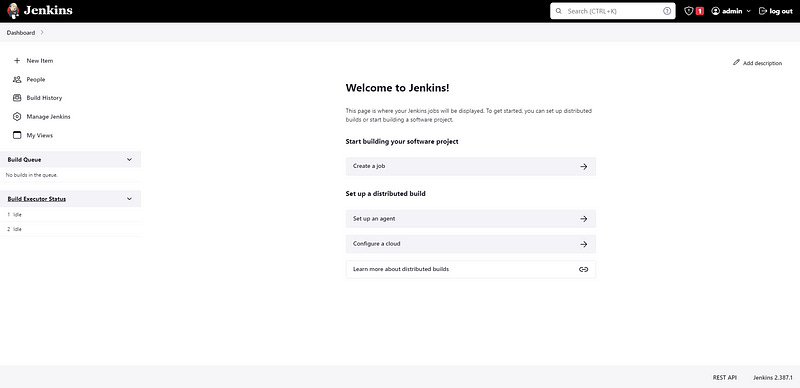
Sau khi cài đặt hoàn tất, tạo tài khoản, thiết lập domain và bắt đầu sử dụng Jenkins.
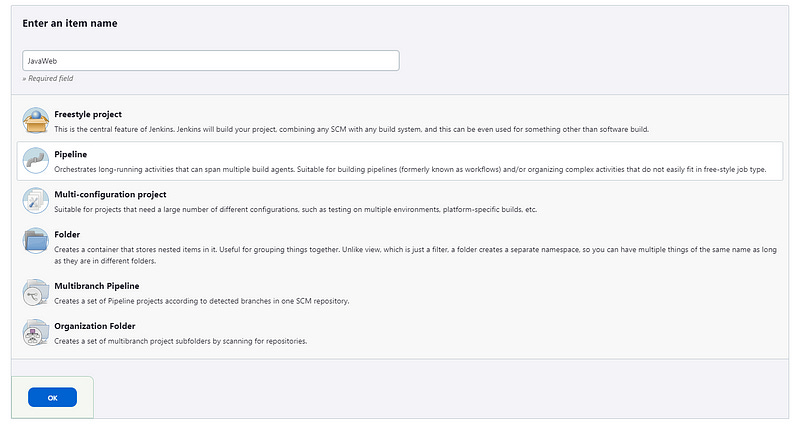
Tạo Jenkins's job
Bấm + New Item hoặc Create a job, nhập tên (JavaWeb) và chọn Pipeline. Sau đó bấm OK:
Kéo xuống phần Pipeline.
Ở mục
Definition, chọnPipeline script from SCM(Chúng ta sẽ pull Jenkinsfile từ GitHub repo về thay vì trực tiếp viết Jenkinsfile trên pipeline)Ở phần
SCM, chọnGit(Trong các plugin gợi ý đã cài đặt ban đầu đã bao gồm Git plugin, cho phép chúng ta poll, fetch, checkout và merge nội dung của các git repository)Ở phần
Repository URL, dán URL Github repo của bạn
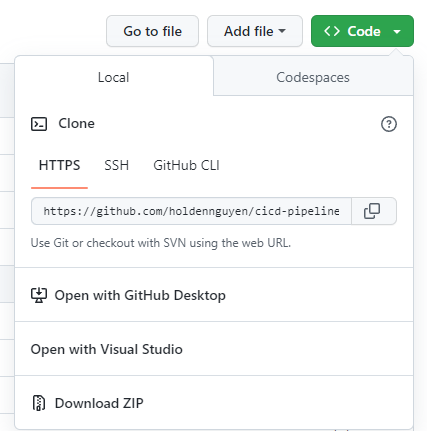
Chúng ta sẽ checkout public repository với HTTPS nên để
Credentialslà- none -.
Trong phần
Branch Specifier (blank for 'any'), sửa thành*/main
Bấm Apply và Save
Khi chạy pipeline này, Jenkins sẽ clone Github repo về workspace trên agent chạy pipeline đó. Trong bài hướng dẫn này, đường dẫn của workspace sẽ là
/var/lib/jenkins/workspace/[Job name]trên Jenkins server EC2 instance.
Giải thích Jenkinsfile
Maven build
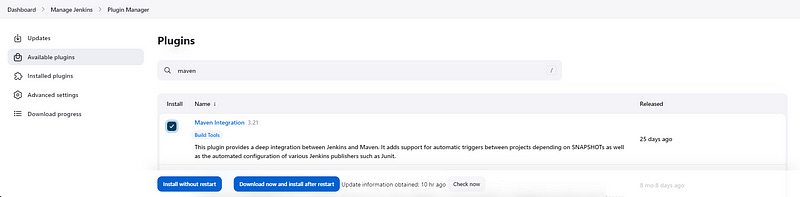
Để sử dụng Maven build artifact từ Java source code, chúng ta cần cài Maven plugin cho Jenkins. Vào Manage Jenkins > Manage Plugins > Available plugins, tìm và cài đặt plugin Maven Integration:
Sau khi cài đặt thành công, vào Manage Jenkins > Global Tool Configuration. Bấm Add Maven, và chọn Name. (Bạn có thể chọn các version khác nếu muốn)
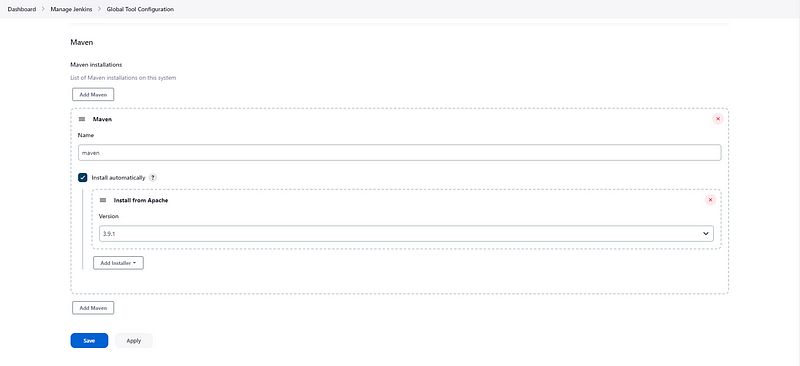
Bấm Apply và Save
Các dòng dưới đây trong Jenkinsfile sẽ configure pipeline cài đặt Maven (maven trong '' là Name mà bạn nhập vào ở phần Global Tool Configuration trước đó)
tool {
  maven 'maven'
}
và dùng lệnh mvn clean install package để build Java project:
stages {
        stage('Build') {
            steps {
                sh 'mvn clean install package'
            }
        }
        ...
}
pom.xml
Bạn sẽ cần một file pom.xml trong GitHub repository. Chúng ta sẽ khai báo các thông tin của build artifact và cập nhật version mỗi khi muốn triển khai thay đổi source code của dự án ở đây. Bạn có thể đọc thêm thông tin về POM tại đây.
<project xmlns="http://maven.apache.org/POM/4.0.0" xmlns:xsi="http://www.w3.org/2001/XMLSchema-instance"
xsi:schemaLocation="http://maven.apache.org/POM/4.0.0 http://maven.apache.org/maven-v4_0_0.xsd">
<modelVersion>4.0.0</modelVersion>
<groupId>com.mylab</groupId>
<artifactId>MyLab</artifactId>
<packaging>war</packaging>
<version>0.0.1</version>
<name>MyLab</name>
<url>http://maven.apache.org</url>
<dependencies>
<dependency>
<groupId>junit</groupId>
<artifactId>junit</artifactId>
<version>4.13.1</version>
<scope>test</scope>
</dependency>
</dependencies>
<build>
<finalName>${project.artifactId}-${project.version}</finalName>
</build>
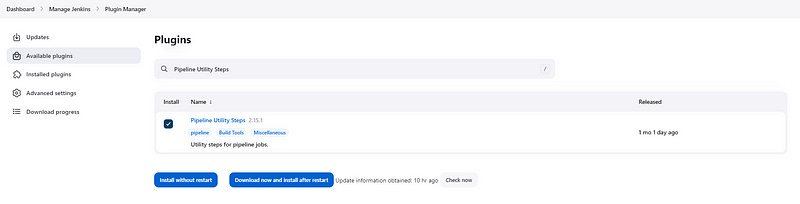
</project>Để hiển thị thông tin artifact trong log của pipeline khi chạy, chúng ta sẽ sử dụng biến môi trường trong Jenkinsfile để lấy thông tin trong pom.xml. Cài đặt plugin Pipeline Utility Steps:
Trong Jenkinsfile, những dòng này sẽ lấy nội dung trong file pom.xml của repository:
environment {
        ArtifactId = readMavenPom().getArtifactId()
        Version = readMavenPom().getVersion()
        GroupId = readMavenPom().getGroupId()
        Name = readMavenPom().getName()
và in ra log khi chạy pipeline:
stage('Print Environment variables') {
            steps {
                echo "Artifact ID is '${ArtifactId}'"
                echo "Group ID is '${GroupId}'"
                echo "Version is '${Version}'"
                echo "Name is '${Name}'"
            }
        }
Tải artifacts lên Nexus repository
Chúng ta sẽ lưu RELEASE/SNAPSHOT version của artifacts mỗi khi có thay đổi trong source code của Java web bằng cách sử dụng Sonatype Nexus
Thiết lập Nexus-Server
Truy cập http://[Địa chỉ IPv4 public của Nexus server]:8081 qua trình duyệt web. Chọn Login ở góc trên bên phải.
Làm theo hướng dẫn để lấy admin password: chạy lệnh sudo cat /opt/sonatype-work/nexus3/admin.password trên Nexus-server CLI.
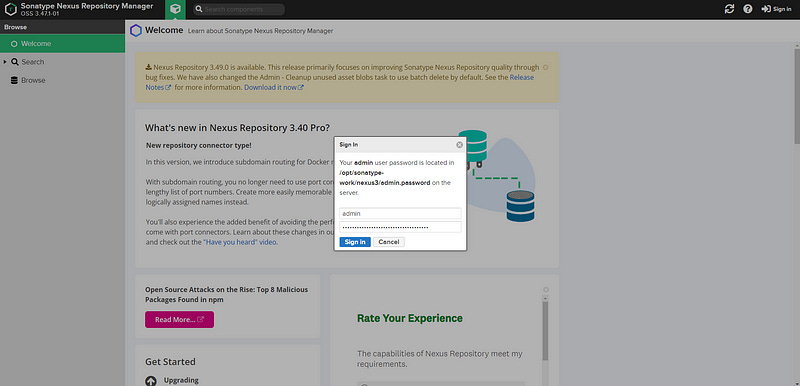
Tiếp tục thiết lập mật khẩu ở lần đầu sử dụng. Chọn Enable anonymous access. Trong hướng dẫn này, Nexus account của chúng ta là admin với mật khẩu admin
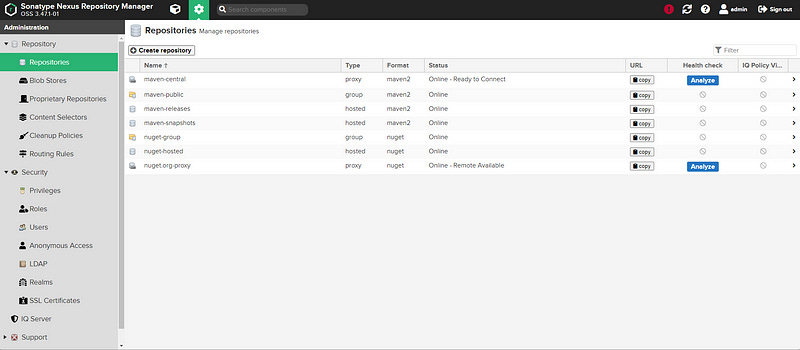
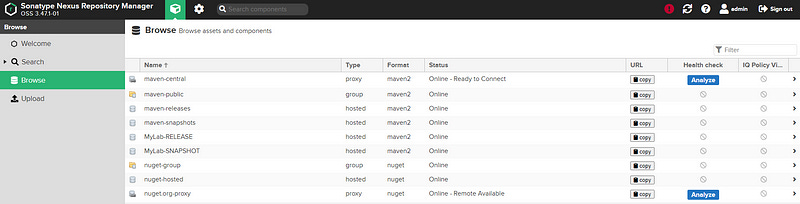
Mặc định Nexus đã có hai repository
maven-releasesvàmaven-snapshots. Bạn có thể bỏ qua các bước kế tiếp nếu muốn sử dụng repo mặc định đó, nhớ đảm bảo cập nhật tên của Nexus repo được khai báo trongJenkinsfile
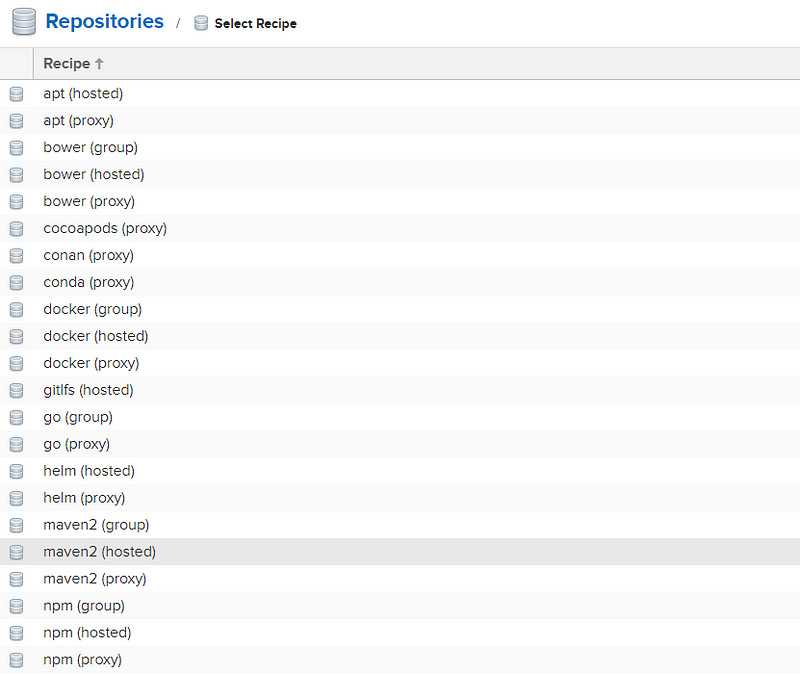
Bấm vào biểu tượng bánh răng ⚙️ ở thanh công cụ phía trên, chọn Repositories ở phía bên trái. Tiếp tục chọn Create repository
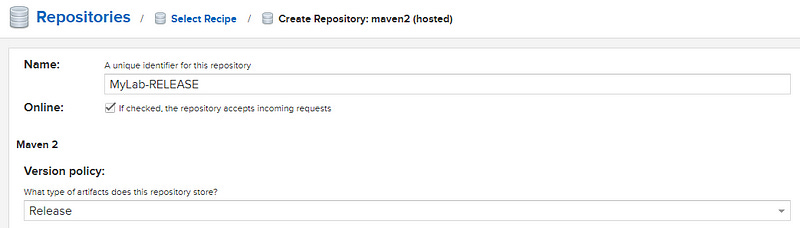
Chọn Recipe: maven2 (hosted)
Nhập tên: MyLab-RELEASE và chọn What type of artifacts does this repository store? là Release
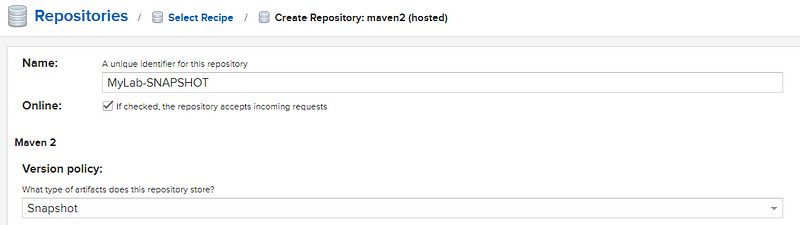
Thực hiện lại các bước để tạo thêm một repo khác với tên: MyLab-SNAPSHOT và chọn What type of artifacts does this repository store? là Snapshot
Quay lại tab Nexus Browser, danh sách các repo sẽ trông như sau:
Thiết lập trên Jenkins-Server
Mục tiêu của chúng ta là Jenkins pipeline sẽ tải maven build artifact lên Nexus repo tương ứng. Đầu tiên, chúng ta cần Add Credentials để truy cập Nexus repositories.
Kind:
Username with passwordUsername: admin
Password: admin
ID: nexus
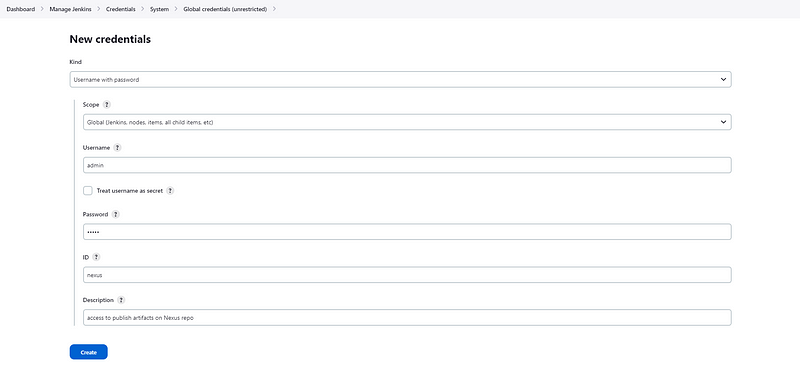
Bấm Create

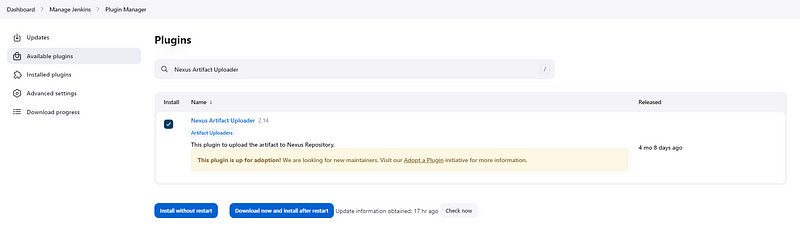
Sau đó, cài đặt plugin Nexus Artifact Uploader trên Jenkins:
Sau khi cài đặt plugin. Mở Jenkins pipeline JavaWeb đã tạo. Ở mục bên trái, chọn Pipeline Syntax > Snippet Generator để tạo cú pháp cho Jenkinsfile. Chọn Sample Step is nexusArtifactUploader: Nexus Artifact Uploader
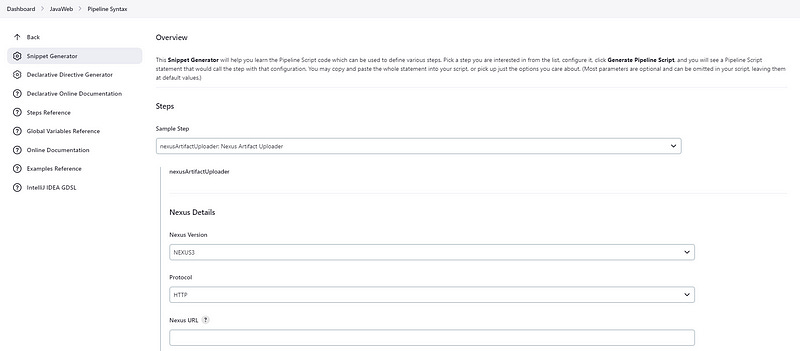
Nexus Version:
NEXUS3Protocol:
HTTPNexus URL:
[Your Nexus-Server Public IPv4]:8081Credentials: select your nexus credential you just created in previous step.
GroupId: ${GroupId}
Version: ${Version}
Repository: ${NexusRepo}
Artifacts: Bấm
Add.
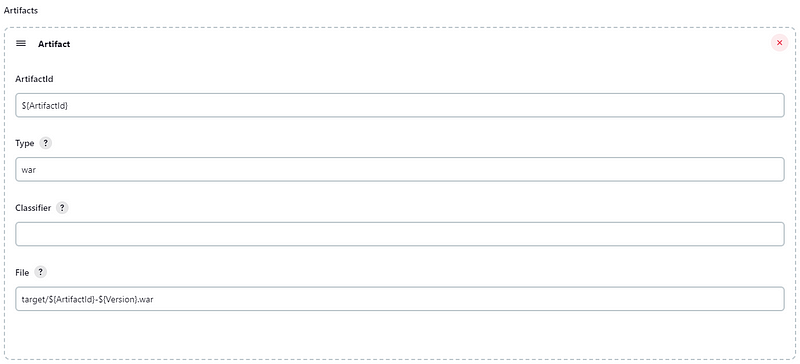
Chúng ta sử dụng
${environment variable}để tự động lấy thông tin cập nhật theo filepom.xml.
Bấm Generate Pipeline Script, và chúng ta sẽ có đoạn script như sau:

Copy cú pháp đó vào Jenkinsfile và quay lại Dashboard. Cú pháp của Nexus stage trong Jenkinsfile sẽ như sau:
stage('Publish to Nexus') {
            steps {
                script {
                    def NexusRepo = Version.endsWith("SNAPSHOT") ? "MyLab-SNAPSHOT" : "MyLab-RELEASE"

                    nexusArtifactUploader artifacts:
                    [
                        [
                            artifactId: "${ArtifactId}",
                            classifier: '',
                            file: "target/${ArtifactId}-${Version}.war",
                            type: 'war'
                        ]
                    ],
                    credentialsId: 'nexus',
                    groupId: "${GroupId}",
                    nexusUrl: '10.0.0.48:8081',
                    nexusVersion: 'nexus3',
                    protocol: 'http',
                    repository: "${NexusRepo}",
                    version: "${Version}"
                }
            }
        }
Hàm
def NexusRepo = Version.endsWith("SNAPSHOT") ? "MyLab-SNAPSHOT" : "MyLab-RELEASE"được dùng để chọnNexus repodựa trên thông tinversionkhai báo trong filepom.xml.Trong trường hợp muốn backup artifact thay vì release, thêm
SNAPSHOTvào phần<version>trong filepom.xml. Ví dụ:<version>0.0.1-SNAPSHOT</version>
Cấu hình Ansible Controller trong Jenkins pipeline.
Stage Deployment trong pipeline sẽ sử dụng Ansible. Trước đó, chúng ta cần thêm Credential cho Jenkins Server để có thể truy cập Ansible Controller.
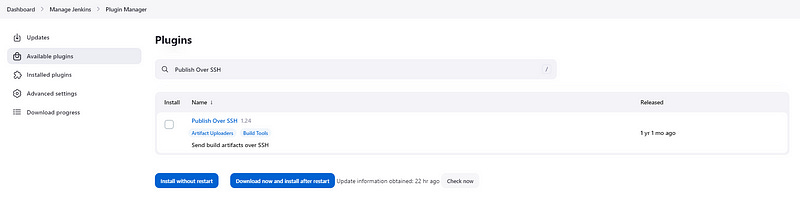
Vào phần Manage Jenkins > Plugin Manager, tìm plugin Publish Over SSH và chọn Download now and install after restart
Sau khi cài đặt thành công, vào phần Manage Jenkins > Configure System. Kéo xuống mục phía dưới, ở phần SSH Servers, bấm Add:
Name: ansible-controller
Hostname: [Your Ansible Controller Private IP]
Username: ansibleadmin
Remote Directory: /home/ansibleadmin
Bấm Advanced và chọn Use password authentication, or use a different key
Passphrase / Password: ansibleadmin
Kéo xuống và bấm Test Configuration, nếu kết nối thành công sẽ hiển thị Success như dưới đây
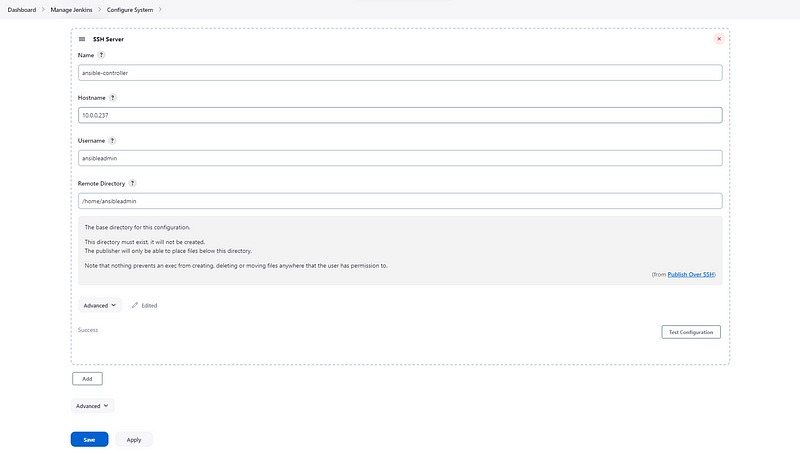
Bấm Apply và Save.
Mục tiêu của chúng ta là copy
ansible playbook files,ansible inventory filestừJenkins-ServersangAnsible-Controllervà chạy thông quaAnsible CLI
Mở Jenkins pipeline JavaWeb. Ở phía bên trái, chọn Pipeline Syntax > Snippet Generator để tạo cú pháp cho Jenkinsfile. Chọn Sample Step là sshPublisher: Send build artifacts over SSH.
Name: chọn
ansible-controllerTransfer Set:Source files:
download-deploy.yaml, hostsRemote directory:
/playbooks(thư mục này trênAnsible-Controllersẽ được tạo để lưu file được copy từJenkins-Server)Exec command:
cd playbooks/ && ansible-playbook download-deploy.yaml -i hosts
Bấm Generate Pipeline Script, và chúng ta sẽ có đoạn script sau:

Copy đoạn script đó vào Jenkinsfile và quay lại Dashboard. Đây sẽ là Deploy stage trong Jenkinsfile:
stage('Deploy to Docker') {
            steps {
                echo 'Deploying...'
                sshPublisher(publishers:
                [sshPublisherDesc(
                    configName: 'ansible-controller',
                    transfers: [
                        sshTransfer(
                            sourceFiles: 'download-deploy.yaml, hosts',
                            remoteDirectory: '/playbooks',
                            cleanRemote: false,
                            execCommand: 'cd playbooks/ && ansible-playbook download-deploy.yaml -i hosts',
                            execTimeout: 120000,
                        )
                    ],
                    usePromotionTimestamp: false,
                    useWorkspaceInPromotion: false,
                    verbose: false)
                ])
            }
        }
✌️ Jenkinsfile của chúng ta đã hoàn tất!
🚚 Continuous Deployment với Ansible
Thiết lập SSH Credentials giữa Ansible-Controller và Dockerhost
Remote SSH vào Ansible-Controller với user ansibleadmin, password ansibleadmin:
ssh ansibleadmin@[Your Ansible-Controller Public IP]
...
ansibleadmin@52.91.160.84's password:
Tạo ssh keypair bằng lệnh ssh-keygen
[ansibleadmin@ip-10-0-0-237 ~]$ ssh-keygen
Generating public/private rsa key pair.
Enter file in which to save the key (/home/ansibleadmin/.ssh/id_rsa):
Created directory '/home/ansibleadmin/.ssh'.
Enter passphrase (empty for no passphrase):
Enter same passphrase again:
Your identification has been saved in /home/ansibleadmin/.ssh/id_rsa.
Your public key has been saved in /home/ansibleadmin/.ssh/id_rsa.pub.
The key fingerprint is:
SHA256:LwV0cZlxt2qyX7zu6uVygLfrnXQfDNDK0PIeCNAshpg ansibleadmin@ip-10-0-0-237.ec2.internal
The key's randomart image is:
+---[RSA 2048]----+
|  o ..o . o.o+. .|
| E . o.+ ...+. ..|
|    . ...o o . . |
|        ..* o .  |
|        S..*.+   |
|         o..=o+  |
|        . .o. oB.|
|         .  .o*.*|
|            o*BB.|
+----[SHA256]-----
Sau đó chạy lệnh ssh-copy-id ansibleadmin@[Địa chỉ Private IP của Dockerhost] để copy public key sang Dockerhost, cho phép Ansible-Controller kết nối SSH với Dockerhost mà không cần phải xác thực lại trong những lần sau.
[ansibleadmin@ip-10-0-0-237 ~]$ ssh-copy-id ansibleadmin@10.0.0.85
/usr/bin/ssh-copy-id: INFO: Source of key(s) to be installed: "/home/ansibleadmin/.ssh/id_rsa.pub"
The authenticity of host '10.0.0.85 (10.0.0.85)' can't be established.
ECDSA key fingerprint is SHA256:Zghtxh+5N5xRs4CgyXm7WEobMD18MF5bVhDLOE2EqTg.
ECDSA key fingerprint is MD5:03:8b:ee:bd:3f:bf:63:93:b5:49:f1:a8:6f:7b:7c:e8.
Are you sure you want to continue connecting (yes/no)? yes
/usr/bin/ssh-copy-id: INFO: attempting to log in with the new key(s), to filter out any that are already installed
/usr/bin/ssh-copy-id: INFO: 1 key(s) remain to be installed -- if you are prompted now it is to install the new keys
ansibleadmin@10.0.0.85's password:

Number of key(s) added: 1

Now try logging into the machine, with:   "ssh 'ansibleadmin@10.0.0.85'"
and check to make sure that only the key(s) you wanted were added
Cập nhật ansible inventory
Mở file hosts trong Github repository, cập nhật địa chỉ IP dưới dòng [Dockerhost] thành [Địa chỉ IP Private của Dockerhost]
[dockerhost]
10.0.0.85
Tạo file ansible-playbook
File ansible playbook sẽ hướng dẫn Ansible thực hiện các công việc sau trên Dockerhost:
Tải artifacts mới nhất từ Nexus repository release.
Tạo Dockerfile base Apache-Tomcat và copy latest artifact và root folder của web server.
Build Docker image và run container.
Tham khảo file playbook trong Github repo này: download-deploy.yaml. Cú pháp trong file được giải thích như sau:
Thực hiện công việc trên Dockerhost bằng cách khai báo group name [dockerhost] trong inventory file hosts:
hosts: dockerhost
  become: true
Tải phiên bản artifacts mới nhất từ Nexus repo release bằng Search API.:
curl -u [Nexus account]:[Nexus password] -L "http://[Your Nexus-Server Private IP]:8081/service/rest/v1/search/assets/download?sort=version&repository=[Nexus repository name]&maven.groupId=[groupID in pom.xml]&maven.artifactId=[artifactId in pom.xml]&maven.extension=[packaging in pom.xml]" -H "accept: application/json" --output /home/ansibleadmin/latest.war'Trong file ansible playbook, cú pháp sẽ trông như sau:
...
  tasks:
      - name: Download the war file
        shell: 'curl -u admin:admin -L "http://10.0.0.48:8081/service/rest/v1/search/assets/download?sort=version&repository=MyLab-RELEASE&maven.groupId=com.mylab&maven.artifactId=MyLab&maven.extension=war" -H "accept: application/json" --output /home/ansibleadmin/latest.war'
        args:
          chdir: /home/ansibleadmin
Tạo Dockerfile trên Dockerhost để build Apache-Tomcat image
Chúng ta sẽ dùng image tomcat trên Dockerhub làm base image. Sau đó copy the downloaded artifact vào root folder của tomcat web server /usr/local/tomcat/webapps. Cuối cùng, cấp access cần thiết và chạy Tomcat server bằng catalina.sh script.
catalina.shlà một shell script đi kèm với Apache Tomcat và cung cấp một số options có thể sử dụng để tùy chỉnh server.
Nội dung của Dockerfile sẽ như sau:
FROM tomcat:latest
LABEL Author: "Minhung"
ADD ./latest.war /usr/local/tomcat/webapps
RUN chmod +x $CATALINA_HOME/bin
EXPOSE 8080
CMD ["catalina.sh", "run"]
Trong file ansible playbook, task này sẽ trông như sau:
tasks:
    ...
    - name: Create Dockerfile with content
      copy:
        dest: /home/ansibleadmin/Dockerfile
        content: |
                FROM tomcat:latest
                LABEL Author: "Minhung"
                ADD ./latest.war /usr/local/tomcat/webapps
                RUN chmod +x $CATALINA_HOME/bin
                EXPOSE 8080
                CMD ["catalina.sh", "run"]
Build image và run container trên Dockerhost
Thay vì chạy lệnh shell script thủ công để run và xóa image khi re-run, sử dụng ansible task với force: yes sẽ giúp tự động build lại image. (Ansible will sẽ thêm option --no-cache=true vào lệnh docker build)
tasks:
    ...
    - name: Build an image
      docker_image:
        name: mylab-image
        path: /home/ansibleadmin
        force: yes
        state: present
Đối với việc run container, sử dụng ansible task với recreate: yes sẽ đảm bảo container đã được tạo sẽ được dừng và xóa bỏ trước khi container mới được run lại trên Dockerhost khi cập nhật source code. Container của chúng ta sẽ được expose ở port 8080.
tasks:
    ...
    - name: Run the container
      docker_container:
        name: mylab-container
        image: mylab-image:latest
        state: started
        recreate: yes
        published_ports:
          - 0.0.0.0:8080:8080
Vậy là chúng ta đã tạo xong một CI/CD pipeline cho Java Web app trên Jenkins!✌️
⭐️ Kiểm tra thành quả
Mở Jenkins và chạy CI/CD pipeline đã tạo. Kết quả chạy thành công sẽ trông như sau:

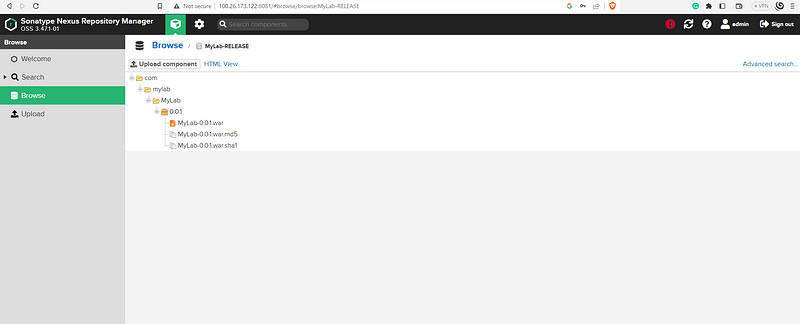
Mở Nexus và chọn repository release. Kết quả sẽ trông như sau:
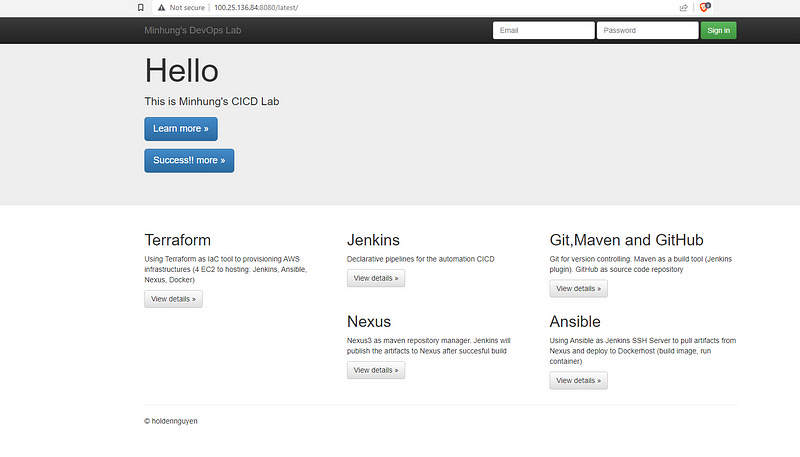
Kiểm tra Jave web app bằng cách truy cập http://[Public IPv4 của Docker host]:8080/latest/ thông qua trình duyệt.
Bây giờ mỗi khi có thay đổi trong source code của Java web, chỉ cần push (merge vào main branch) lên GitHub repository. Vào Jenkins pipeline bấm Build Now, Java web sẽ được tự động cập nhật và triển khai.
Bạn cũng có thể tự động việc bấm
Build Nowtrong Jenkins bằng cách vào phầnConfigurationtrong pipeline. ChọnPoll SCMở phầnBuild Triggervà quy định việc lên lịch. Bấm vào ký hiệu?để xem hướng dẫn cách lên lịch cho poll.
Xử lý lỗi
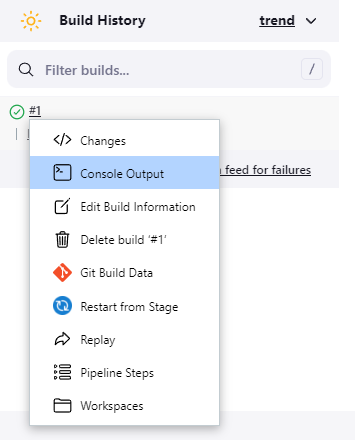
Nếu pipeline gặp lỗi khi chạy, mở Console Output của lần build # để xác định stage gặp sự cố.
Thực hiện thủ công stage đó trên server tương ứng để tìm nguyên nhân gây ra vấn đề.
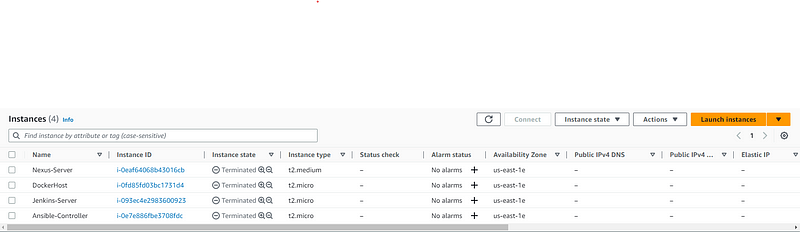
Dọn dẹp AWS Infrastructure
Hãy nhớ xóa hết AWS resource vừa tạo để tránh phát sinh chi phí sau khi thực hành. Truy cập vào working directory mà chúng ta chạy lệnh terraform lúc bắt đầu, chạy câu lệnh sau để dọn dẹp resource trên AWS:
terraform destroy --auto-approveMở AWS Console để kiểm tra lại lần nữa.
Good Luck!!! 👏 👏 👏